Portrait Drawing Tweaks

Portrait Drawing Tweaks

Nancy has been getting her artwork critiqued weekly for a while now. The biggest struggle I see for Nancy is her photo reference choices.

Nancy usually takes screenshots from her favorite Netflix series. Sometimes the lighting is just , well, horrible. However, as of late Nancy has been making better picks in terms of photos

What I stress over and over again in the critique gallery is repetition. I’m a big believer in systems. Most artists hate systems, they think they are too restrictive.

I find the opposite to be true. Let’s use portrait drawing as an example. When you start a portrait draw the same way every time, you will improve faster.

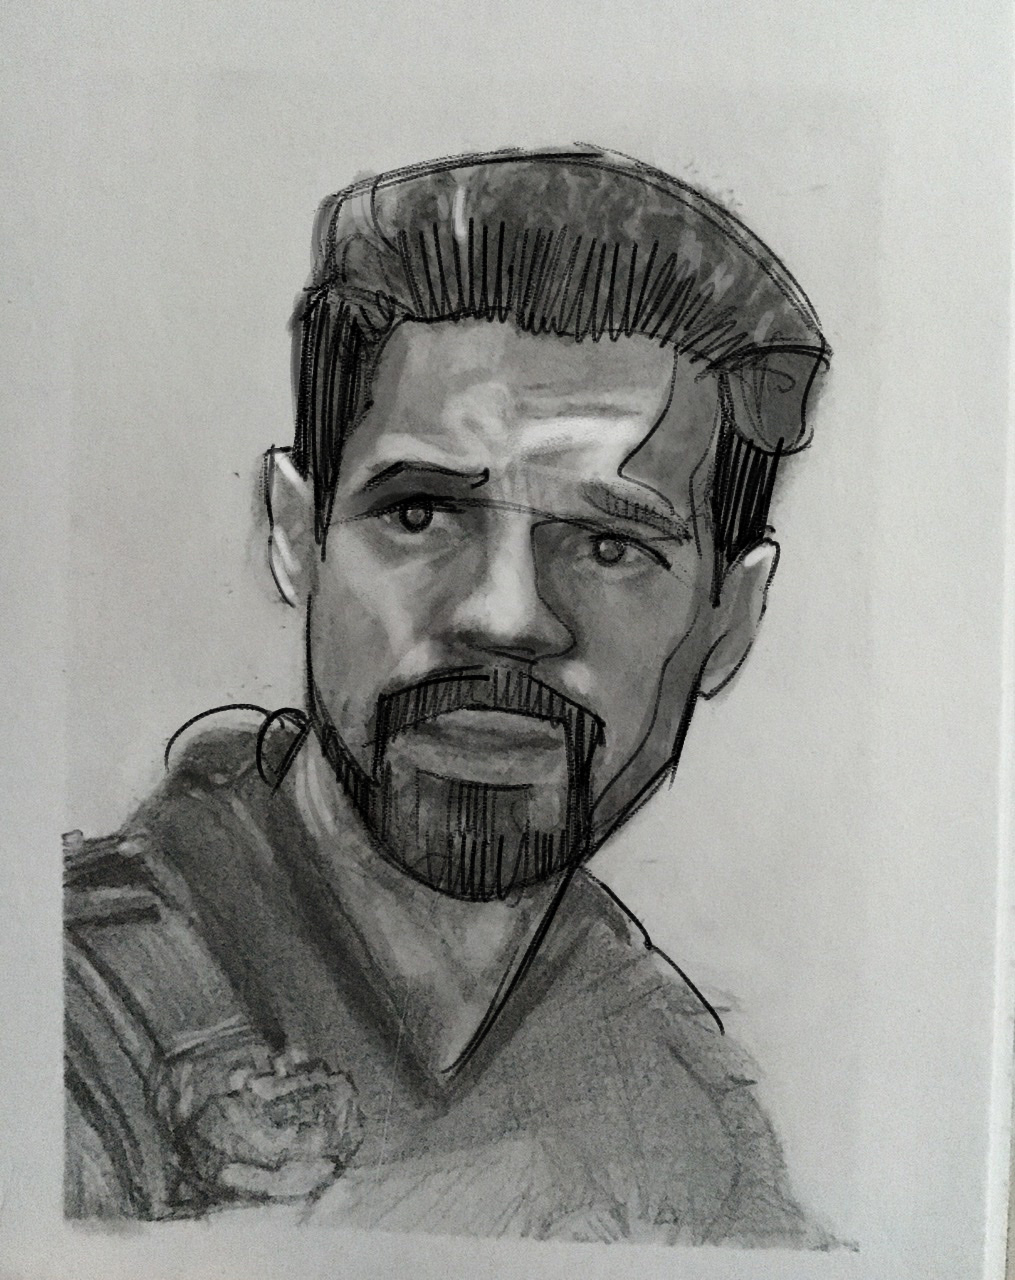
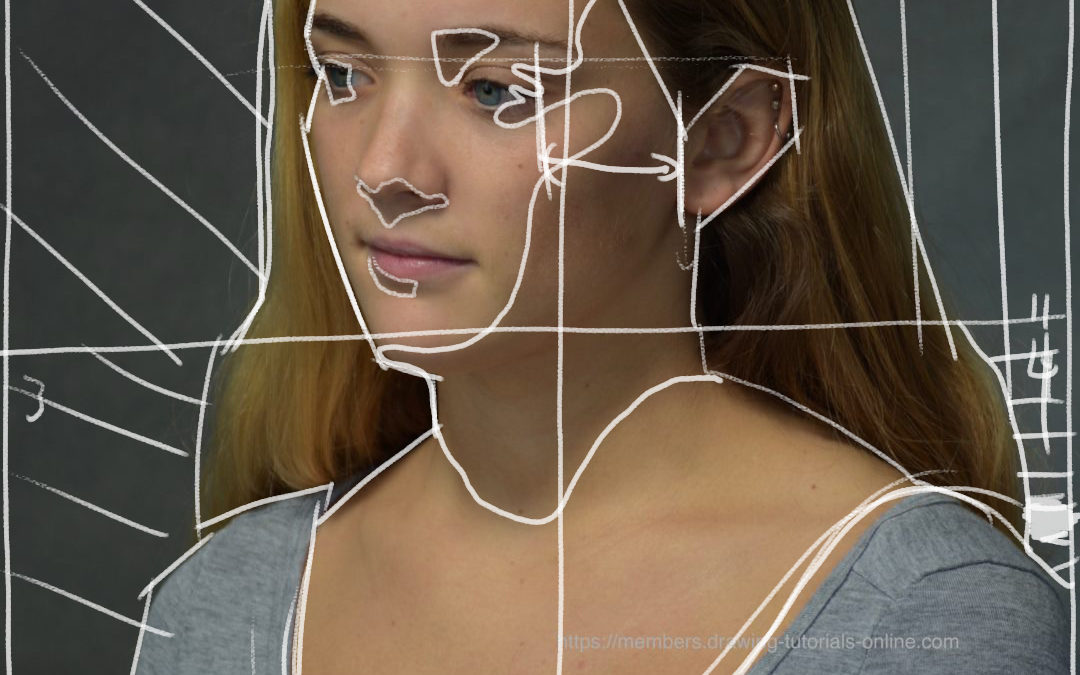
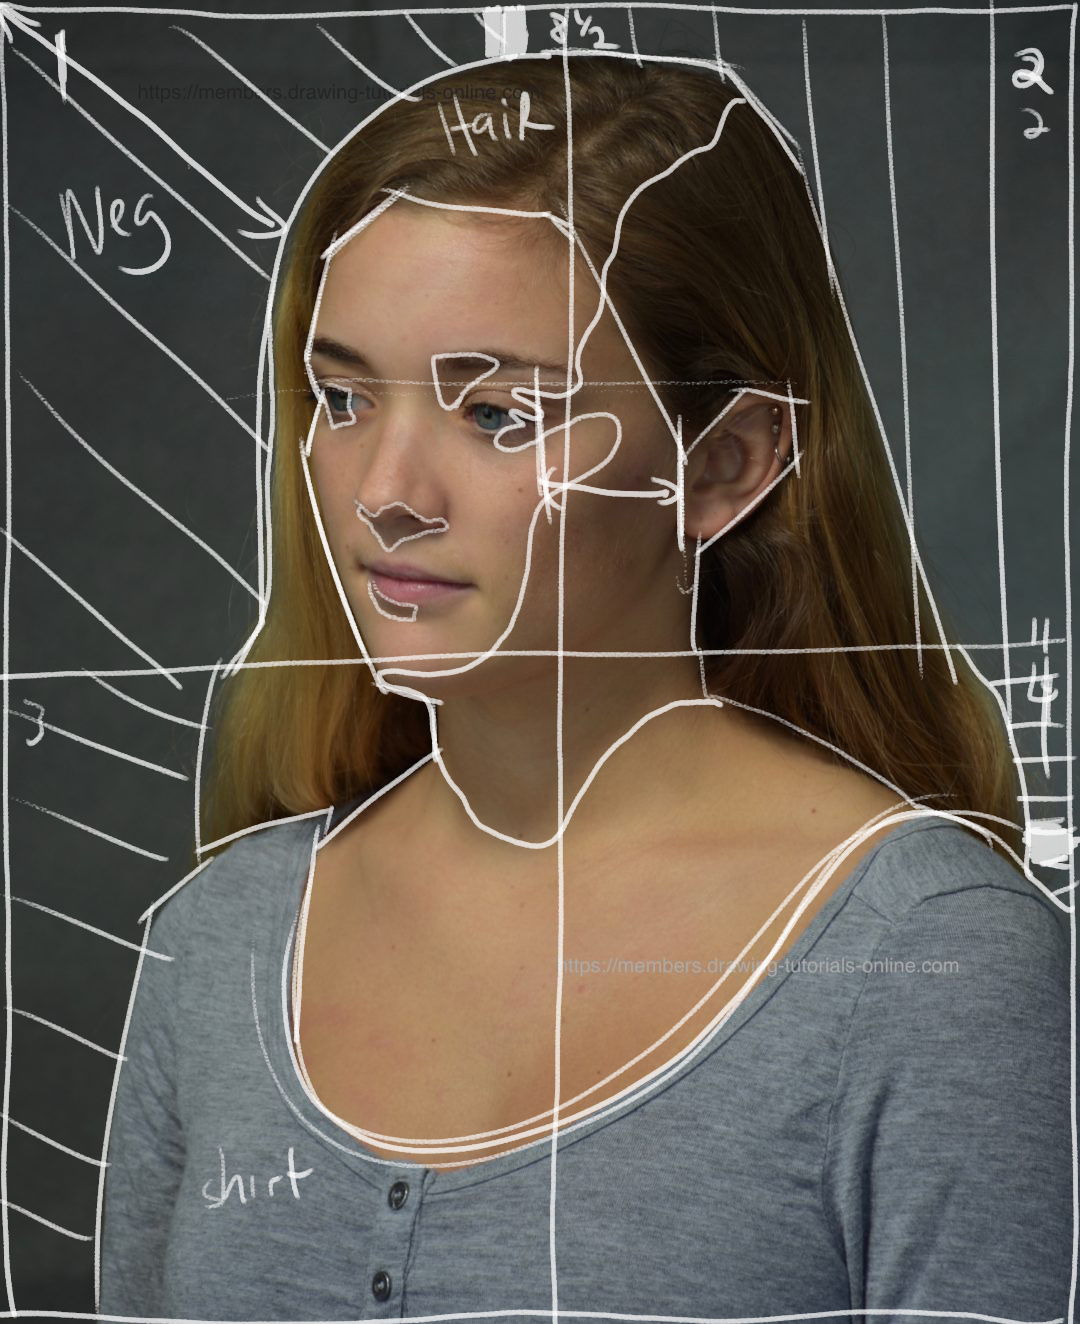
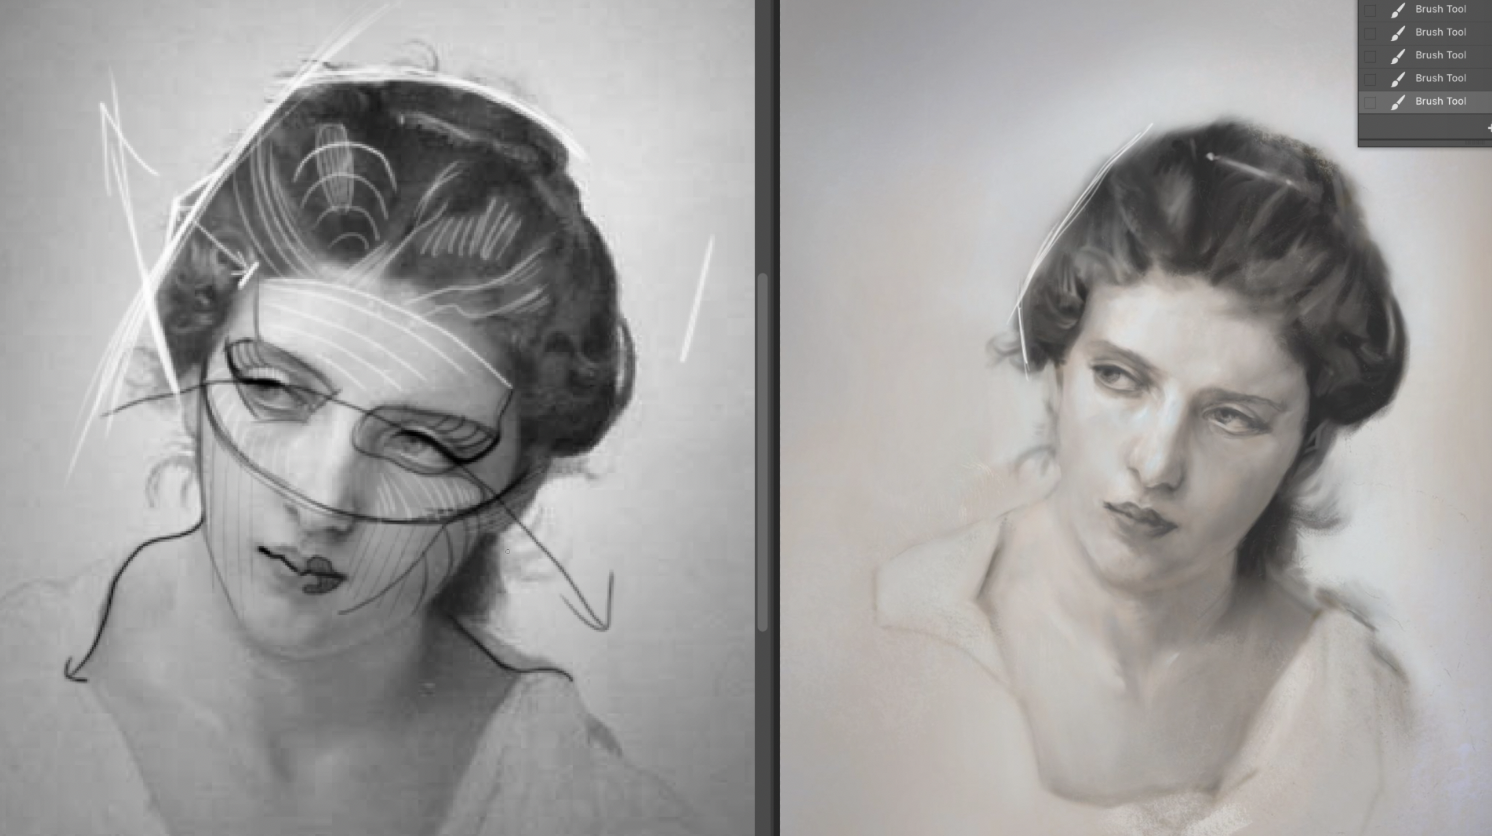
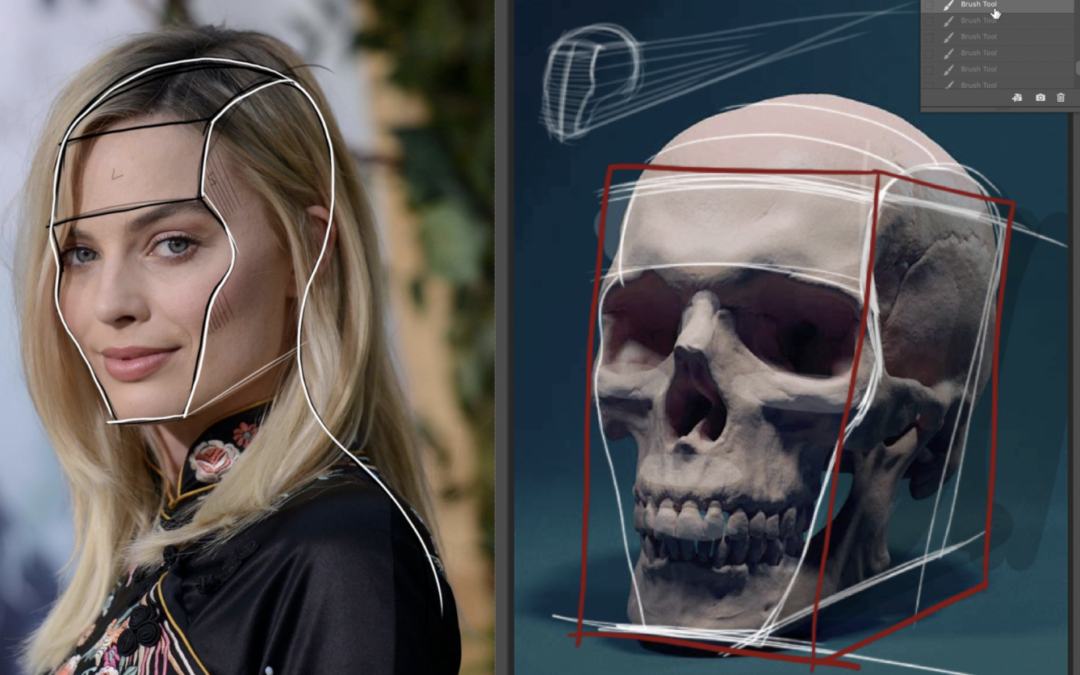
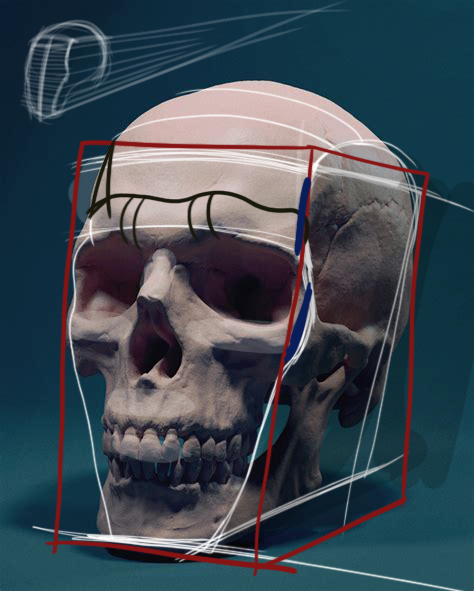
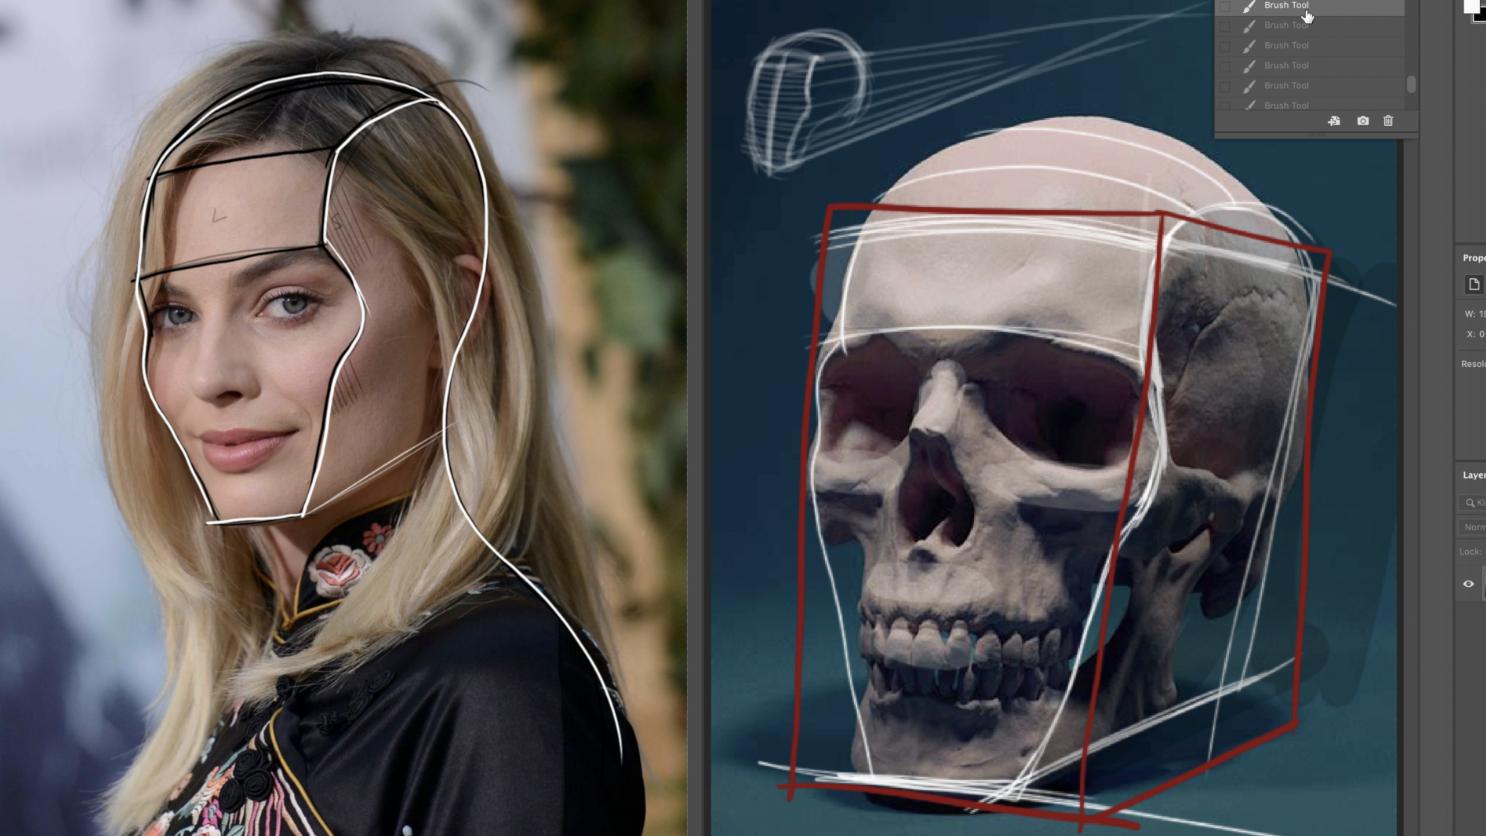
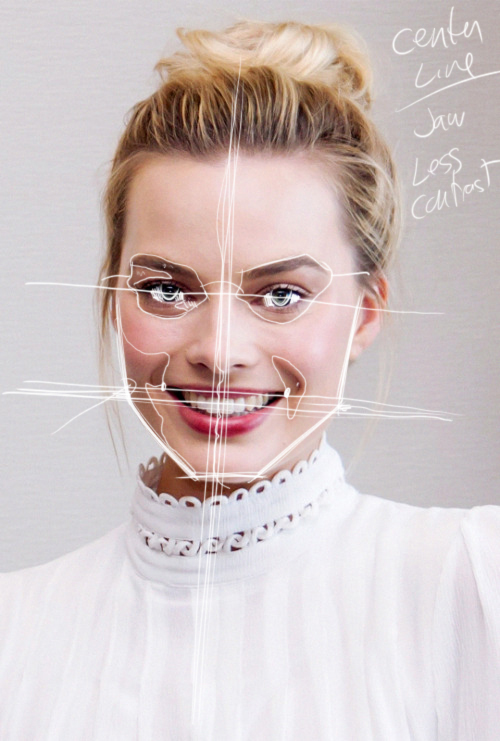
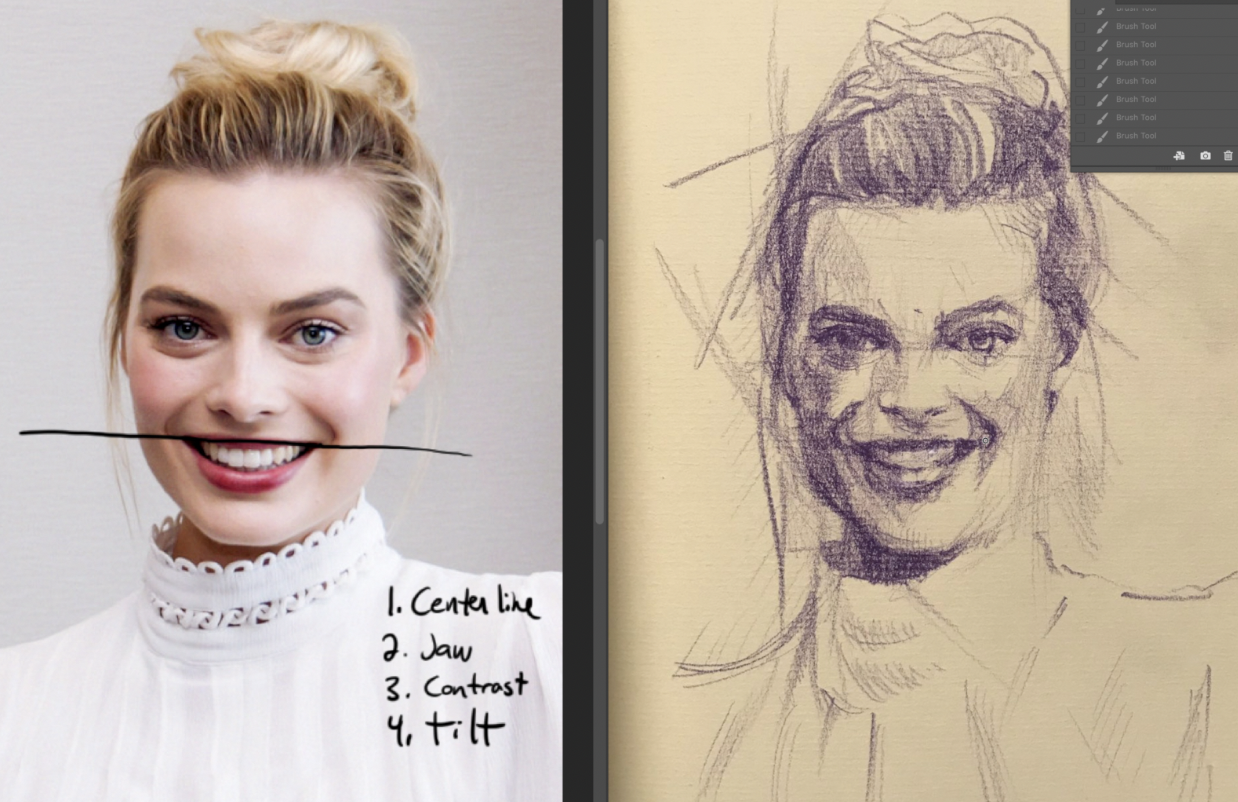
My system for portrait drawing is simple, first draw the outer edge hair, second draw the inner edge of the hair where it touches the skin. Then draw the shape of the face. The features should fit inside the container of the face.

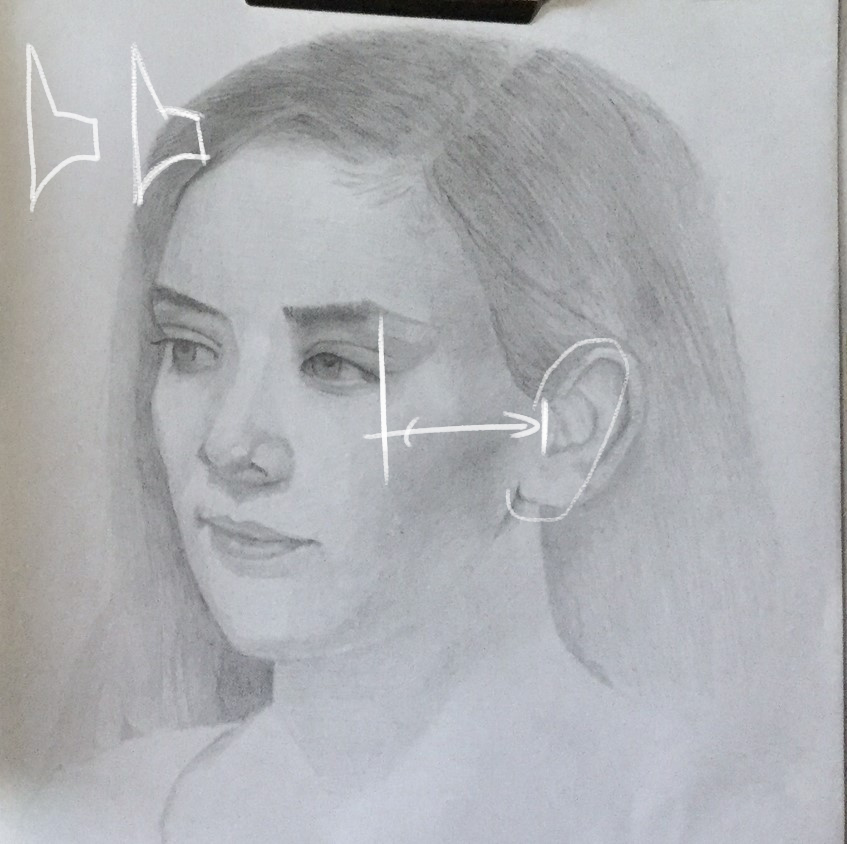
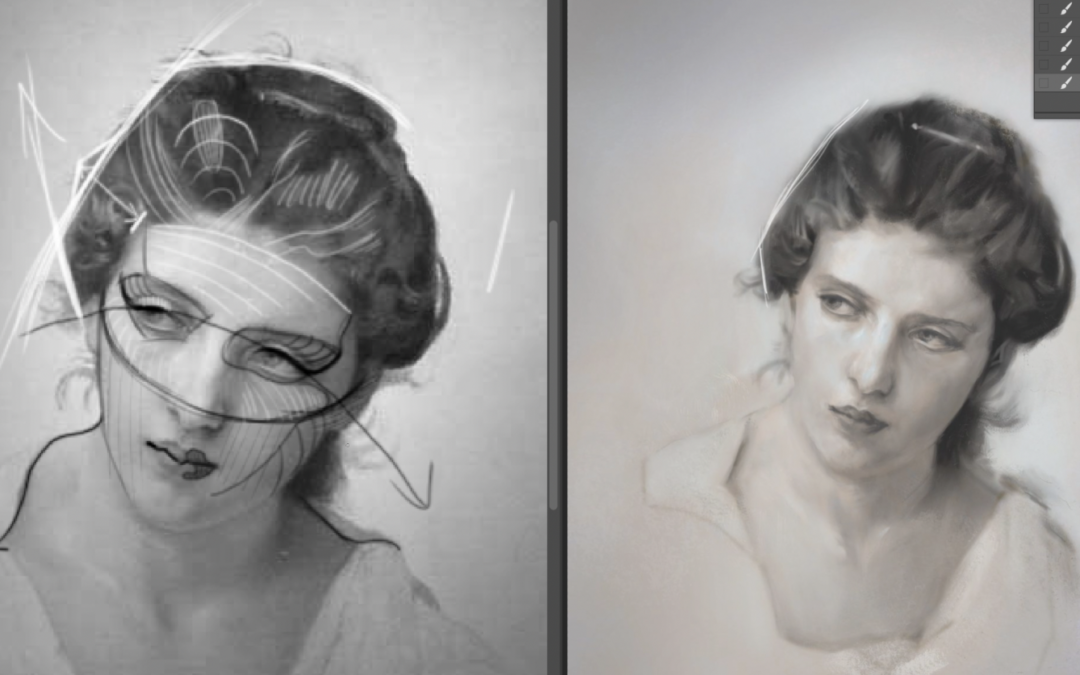
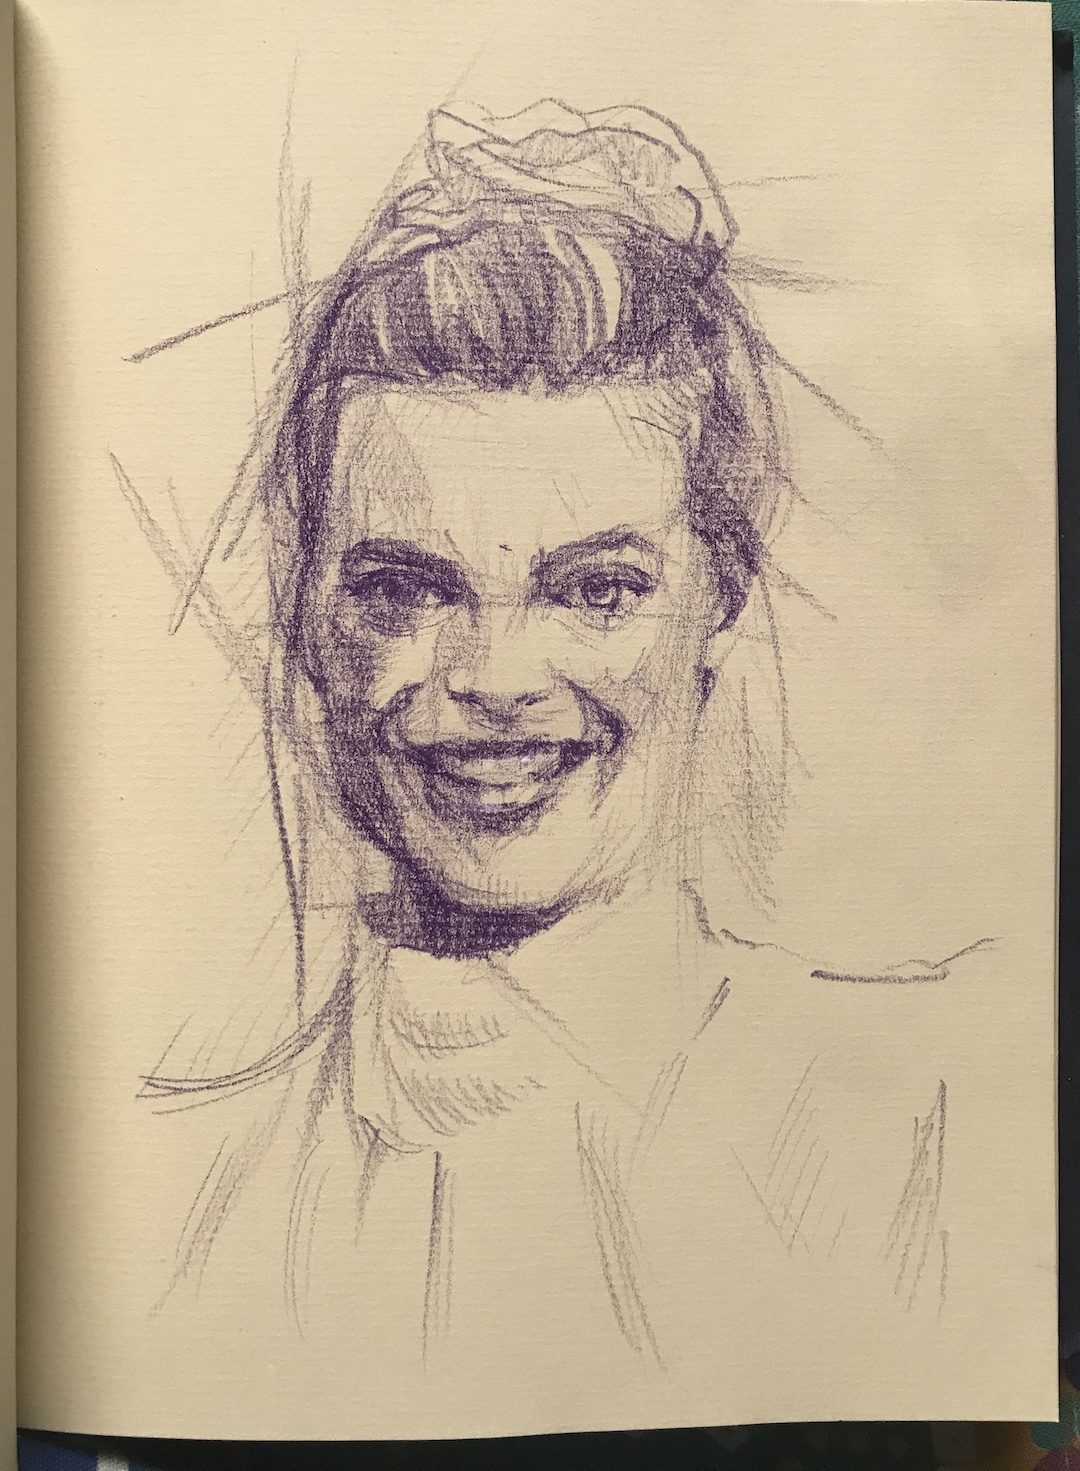
In Nancy’s portrait drawing the features did not fit inside the container of the face. After a couple of tweaks we can see that Nancy was not that far off. Looking forward to the next one Nancy.


Sometimes it is the little things that make a huge difference. I am here to help you improve your artwork. You can get feedback in Drawing Tutorials Online member critique gallery. I also offer one to one coaching if you prefer that route.

Thanks Nancy! 

Under-Drawing Critique – Avoiding Overwhelm

Under-Drawing Critique – Avoiding Overwhelm

Arjun recently uploaded an under-drawing for a critique over in the members area of Drawing Tutorials Online. He mentioned in the comment section of the post that he was feeling a bit overwhelmed with starting.

There is so much to think about when starting to draw the figure for an under-drawing. Proportions, gesture, anatomy as well as light and shade are just a few techniques to consider. I can see where an artist can become overwhelmed, especially when trying to do their best work.

What I do my best to show in this short little video, is a sequence of techniques. Where I like to start, as well as secondary options for starting. I also talk to the importance of using continuous line towards the end of the video.

Also, Arjun was using blind contour, I recommeded using blind contour for just a short period of time, like two seconds. I would save the pure blind contour for a longer thirty-second exercise.


Check out Arjun’s Instagram. Thanks again Arjun for sharing your art.


The Four Boxes Technique

The Four Boxes Technique

Jan recently posted up this portrait drawing for a critique. It was from my Shea Portrait course. Jan is looking to get a likeness when drawing a portrait.

Being able to get a likeness is difficult. Sometimes a student will need to use many diverse techniques. Some techniques click with certain students while others do not. You will need to experiment with multiple techniques until you find the one that works for you.

In this video, I share with Jan the Four Boxes Technique. It’s pretty simple. First, you should draw the exact size of your photo reference frame. So if your reference is 8 x 10 inches, draw an 8 x 10-inch boarder on your piece of paper.

You will need to split the frame vertically down the middle, then across the middle. This will leave you with four boxes. You then draw what is in each box. Nothing earth -shattering here.

this is just a drawing technique that will help you look at drawing a portrait differently. Again, this is just an exercise. This four boxes technique just give you a different perspective on drawing correct proportions.

Thanks so much, Jan for sharing your artwork in DTO’s member critique gallery. 


If you are looking to get your artwork critique definitely check out Drawing Tutorials Online. I offer member critiques every Monday. If you are looking for a more in-depth approach to having your artwork critique read more about my one to one coaching.


Digital Painting Critique

Digital Painting Critique

It does not matter what medium you work in, digital, traditional, watercolor or pencil, it’s super important to get feedback on your artwork. Sure watching high-quality video tutorials online is a must.

However, what will push you to a higher place of learning is getting feedback from a teacher you trust and like. Some teachers are highly skilled and competent, however, they might not be the right fit for you.

It’s also very important that just because the teacher says you should do a, b, and c, does not mean you have to do a, b, and c. Let your voice come through, cherry-pick what works best for you and use that.

There have been many times where I had two teachers contradict each other, it can get confusing as to who to listen to. Most teachers have very good intentions in mind. Just trust your gut and utilize techniques that feel right.

It’s also very important to tweak and modify what teachers offer up in the classroom and online. Think to yourself, how can I take what this teacher is teaching and make it my own.

In Arjun’s critique, I certainly do not expect him to listen to everything I say. If he takes one lesson from the critique, then I feel I did my job.

Be selective in which teachers you learn from. Anyone can grab their iPhone nowadays, film themselves drawing, and call it a tutorial. Do your homework, see how much classroom experience the teacher has. Do they teach in a kind way, or is it all ego-based. Are they good at communicating techniques to you in a way that makes sense?

It can be hard sometimes to put your work out there for a critique. That’s why I say learn from people that you feel comfortable with. Getting feedback is something you must strive for.

Thanks so much for checking out Arjun’s critique!


Check out Arjun’s Instagram. Thanks again Arjun for sharing your art.


Seeing The Head As A Box

Seeing The Head As A Box

Arjun consistently uploads his work for a critique every week. In this week’s critique, I help out Arjun with seeing how to fit a box to a head. You might ask, why even bother with this technique, what’s the point?

I think what Arjun is practicing is super important. He is trying to understand how to see and decipher the surface planes of the head. Placing a portrait within a box is the most primitive way to see the surface planes. It’s the most macro, front and side.

There is a multitude of surface planes on the head. With portraits, it’s important to know where the big surface plane shifts occur. They occur at the temple and cheekbone, otherwise known as the Zygomaticofacial foramen. I know, anatomical terms, ugh.

Understanding where to see and place the big surface planes will most certainly help you to improve the way you draw a three-dimensional portrait. It’s even better when you light the portrait whereas the front planes catch the light, and the side planes are in shadow.

Lastly, trying to place a perfectly geometric box around an organic head just does not compute for a lot of artists. That is why I suggest drawing curved edged, organic boxes instead of right-angled boxes.

The human body is not synthetic, it’s super curvy. In other words, round all of your corners.


Thank you so much for checking out Arjun’s critique. You can check out his Instagram page @AKTracer.


Five Tips For Drawing A Portrait Likeness

Five Tips For Drawing A Portrait Likeness

I recently completed a critique of Arjun’s portrait drawing. Arjun is a member of Drawing Tutorials Online. He is a super hard worker and is improving immensely as of late.

Here are five tips to help you capture a likeness the next time you work on a portrait drawing.

First, you will want to pay attention to the centerline of the head. This will help you tremendously in terms of measuring both sides of the face. It will aid you in getting the correct angle of the head.

Second, do your best to look out for the three angles that make up the lower jaw bone. The mandible is an important structure. It acts as a frame for the lower half of the head. Do not overlook the jawline.

Third, avoid using high-contrast value shifts within the model’s face. Especially when drawing from photo-reference that has soft lighting. Extreme value shifts within the light will make your drawing look too patchy.

Fourth, tilts will most certainly help you capture the model’s likeness. I like to look at the tilt of the eyes. You can also use the tilt of the mouth from corner to corner. This is often overlooked.

Fifth, see the whites of the eyes as shapes that you must draw accurately. Yes, easier said than done, I understand. Take some time to study the shapes of the whites of the eyes. This will help you capture the model’s likeness.


I want to thank Arjun for uploading his work to Drawing Tutorials Online‘s member critique gallery on a regular basis. His hard work is really paying off.

Check out Arjun’s instagram @aktracer.