Portrait Drawing – Lesson One

Portrait Drawing – Lesson One

I just recently finished a brand new portrait drawing course over at Drawing Tutorials Online. I wanted to share with you a few of the chapters since the drawing has gotten a lot of positive feedback.

It’s been while since I’ve posted any drawing tutorials outside of the members area. The six lessons to be posted here at the blog should give you some insight as to how to get started drawing a portrait.

The drawing took me roughly seven to eight hours to complete. My process is quite slow, however if there is a technique within the video that helps you by all means run with it.


This is lesson one, I will be posting six lessons in total here at the blog. Thank you so much for watching.

Please leave a comment below. I’d love to hear your thoughts.

If you would like to jump ahead and watch the course in it’s entirety visit our sign up page at Drawing Tutorials Online. The course comes with a PDF, screencast tutorial and photo reference. Plus when you sign up to Drawing Tutorials Online you will be able to receive feedback on your portrait drawings. 


Alice’s Last Sketchbook – Maybe

Alice’s Last Sketchbook – Maybe

It’s basically one month and one day before I start teaching a whole new group of students at the School of Visual Arts in Manhattan. I still have some sketchbook videos that I really need to post. This is a short but sweet sketchbook that Alice worked on when she was all out of ideas. She just did a bunch of drawings while watching Netflix. She was having a creative slump and worked through it wonderfully.

If you have ever been through a creative slump, or just didn’t feel like creating any art, it’s important that you at least continue to draw. It’s important to look at new artists.

Simply drawing each day in your sketchbook will open up new creative channels that you never thought existed. Of course every artist does need a break from time to time. But just keep sketching. It will keep your eye hand coordination up to speed.

Thanks for watching.


Check out Alice’s Instagram. Stop by and visit okay!


Albert Bierstadt Master Class

Albert Bierstadt Master Class

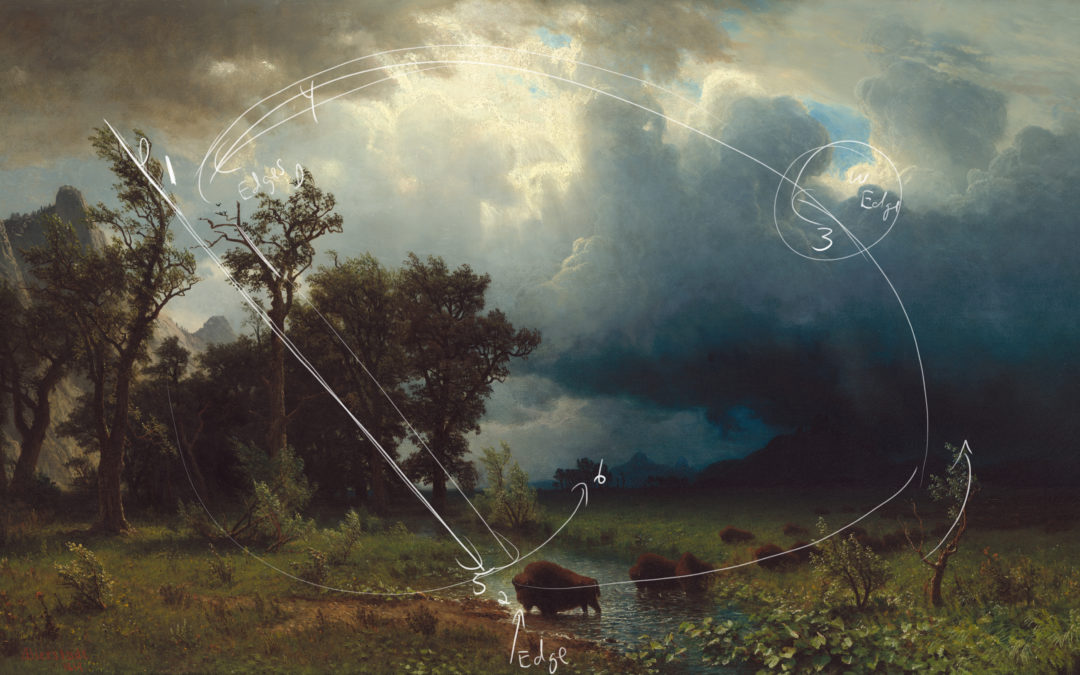
Every so often I film a Master Class lesson. What is a Master Class lesson you say? It’s where I analyze the work of an old master. In this case it’s the work of Albert Bierstadt. It’s a great way for members of Drawing Tutorials Online to hone their image making skills.

In this particular video below you will learn why this image works. You will also start to understand why some of your images work and why some don’t. I’m super passionate about image making. Throughout my eighteen year illustration career I was always trying to create an image that made sense to the viewer. I was always looking for ways to improve my picture making skills.

This video below is just a short sample of what our Master Class lessons have to offer you. If you would like to see many more videos just like this one check out my course listings page.

I’m passionate about helping artists improve their craft in both drawing and image making.


Thanks so much for watching. Leave a comment below, let me know if you learned something from this Master Class lesson. Click on the image below to enlarge the images from this lesson.


Alice’s Two Mini Sketchbooks

Alice’s Two Mini Sketchbooks

Okay you have definitely got to check out Alice’s two mini sketchbooks. All the way from Shanghai Alice can draw with the best of them. I knew from way back in September of 2017 that Alice had a lot of natural raw talent.

Her life drawing is super bold. Her life drawings are big and they have a ton of gesture. I really like how Alice adapts to different drawing environments. Her life drawings are really expressive. She draws mainly with her arm in class, not her fingers.

However in her tiny sketchbooks she is able to draw in such a loose way using just her fingers.

Arms, hands and fingers, you want to use them all when you draw. Always mix up what you are drawing on, just like Alice. In class she draws on a big 18 x 24 pad. However like she said in the video she is really comfortable drawing in a tiny 6″ x 6″ sketchbook. I love that sort of variety.

Be aware of how you draw. Draw only with your fingers and your drawings can look stiff. You want to be conscious of how you draw on a regular basis. When you start to move your arm you bring a loose gestural feeling into your drawings.

Alice is really progressing in class. The sketchbook that she is currently working on is amazing. I hope to film that one in a few weeks.

Thanks for watching. Alice thanks for sharing your sketchbooks!


Follow Alice on Instagram.

Find out how DTO can help you improve your art.


Background Reference – Setting The Scene

Background Reference – Setting The Scene

Okay so you have completed your thumbnail sketches, now what? You most likely have some real questions like, how is my background going to look? What time of day does my scene take place? I’m really not sure how to draw that tree in the background.

That’s where this lesson comes into play. Finding background reference helps you to figure out all of the nitty gritty details in your scene. It helps to take the guess work out of your image making process. Even if you work only from your imagination I encourage you to use background reference.

It’s not about copying pictures exactly. It’s about filling in empty gaps. These gaps of uncertainty usually lead to an inconsistent image making process.

In the illustration I am creating over at Drawing Tutorials Online I stress to members the importance of background reference. For myself I’ve always looked for background reference right after I finished my thumbnail sketches.

Background reference enabled me to visualize my figure within a scene. It helped me to visualize my entire illustration.

It was also a huge part of my creative process. I really enjoyed going out into the field to photograph my own reference. When that was not possible I usually looked to the stock photography sites.

In the case of this illustration I used istockphoto to purchase the rights to use a photographers image. It really did save me a lot of time. Plus I do not live out west so I couldn’t possibly have photographed for the scene.


If you would like to gain access to our full Illustration Process course today take a peek our our subscription options.

Thanks so much for reading!


Get Your Ideas Onto Paper Fast

Get Your Ideas Onto Paper Fast

I’m still amazed by the fact that many artists do absolutely no prep work before starting on their final illustration. Seriously. They just sit down and start working on their final piece with no concept concerning the structure of their image.

Ultimately as they continue to work, the flaws in their image making start to creep in. That’s why I’m creating this “Illustration Process” course at Drawing Tutorials Online. This new course is all about having you take a step back, analyzing your image making process. It’s about making sure you have a system.

System is not really an artistic type of word. However if you want to create consistently good artwork you need a system, or process.

Getting your ideas out onto the paper is a very important step in the image making process. That is where thumbnail sketches come into play.

Thumbnail sketches are meant to be created in five minutes for less. Personally I love to draw them in an impressionistic tonal sort of way. I like to block in big areas of tone with a really soft pencil drawing more like a painter.

Consider thumbnail sketches a visual brain dump.

It’s important that you take some time to draw your concepts out on paper before you start to work on your final illustration. With your first thumbnail drawn you immediately start to question it. Wait maybe if I draw another, this way, it will make more sense. That’s the beauty of creating thumbnail sketches.

They are a no risk way to loosely compose an image with tone, perspective and texture.


I highly recommend that you start to incorporate using thumbnail sketches in your image making process. Remember they are not for drawing details. As you can see in my thumbnail sketches there are not many details at all. Just big shapes of tone placed within the scene.

Do your best to incorporate a dark, middle tone and light into the mix. Placing a horizon line is a good habit to get into as well.

Thumbail sketches work well when combined with your inpirational sentence or image. Try a few, you’ll find they are start to becomne addicting. In short they provide you with many options visually right out of the gate.